Baby Fleur's Crib - Another redo

Happy Good Friday
Happy Birthday Me Saturday
Happy Easter Sunday
and Happy April Fool's Day Monday!

I've not been around lately because.......I had my baby! I had a little girl this past December and everything has sort of been on hold, of course! My babymoon has been full of bliss, with lullabies and baby cries. Everything a FTM should expect. Finally I am ready to show you the big reveal of the nursery, featuring the crib! I hope you like what you see. Please let me know!


Let me begin by telling you that this cute pink crib IS THE BEFORE! Before??? Yes before! When I began my search for a used baby crib, I stumbled upon this pink beauty on CraigsList, for $300. I thought to myself, well I wanted to redo something but this is so sweet I can work with it. I didn't really want pepto bismal pink crib, but again, I was willing to be open minded. What I did like about this crib from the pictures was that it didn't look like anything I had seen from the major retailers, so I was pretty sure it was from some high end boutique....and I was right!


So I drove to Dallas. It was 500 degrees that day, I remember distinctly. I didn't mind because I was the peak of my second trimester and up for ANYTHING! I had asked the owners in advance to not take apart the crib, but when I got there to meet them, they did anyway! Blahhhh! The last thing I wanted was to be buying a crib with missing parts. Wait a minute!!!!!! Wait just a minute there! Upon close inspection, I could see that someone else had already refinished this crib! Gasp! And what a horrid job they had done! My word. I kept my cool though because this crib I was pleased to discover was constructed of heavy wood. I mean, this thing weighed a ton! YES! They explained that they purchased the crib originally for their son, and then when they got pregnant with a little girl, the mother wanted to paint it pink. I told her it was lovely and that I was very excited, which I was. Actually I was really glad because I never wanted a pink crib anyway, and knew that I wouldn't feel guilty refinishing it like my original plan. But before I was willing to fork over the dough, I made them put it back together. Sure enough one part was missing but it wasn't a vital organ, so I bought it. Now before I get into the process, I just want to share with you one more thing. Imagine a small pregnant blonde, driving her husbands lifted truck in all of her glory, along the wild freeways of Dallas Ft. Worth, with a massive PINK crib standing up in the bed of the truck. I had people honking at me and swerving around. I white knuckled it all the way to my mothers, determined to arrive safely with my prize. Yes, pregnancy will make you temporarily insane.


Look ^, Yuck! Sloppy^^^

Please take note, this is the paint that the original owner used to refinish the crib. She was very proud and convinced that this was THE BEST. I will take the liberty in telling you that this is not what you paint furniture with, ever.

.

When I got back home, I immediately got to work.

Step one - Strip! I used regular old paint stripper that would work for an oil base paint. I wore a mask and gloves since I was pregnant, and watched in my 600 degree garage as the paint began to bubble. I found chunks of painters tape underneath that was never properly removed, and even long hairs! Yikes!


Why look! It was teal underneath. Who knew? I surely wasn't expecting that. Such a shame as I am sure the teal would have been pretty for a girl. Oh well. I would like to also note that with AS Chalk Paint, you do not need to strip your furniture, BUT in this sloppy circumstance, I chose to do so anyway. The oil base paint streaks that the previous owner had left was not what I wanted as a canvas for my work of art!


After all of the paint was stripped, I got to sanding with my rotary sander. It was around 700 degrees that time of the day. When I was done, I wiped everything off and moved inside. YES! It was 68 degrees in the house, and there I stayed for the rest of my pregnancy.

Here are the products that I used. I would like you to notice how clean my cans are. It's because I like them that way, but also because AS is not cheap. I have no intention of wasting any of it. For the record, after using these exact cans for two projects, I have only used 1/3 of each can of paint. It's true, AS goes a long way.


I wanted to do something more than just paint. I wanted something unlike anything you would ever normally see on a crib. Something that was beautiful as well as interesting for my baby. My mother and I love rabbits, and have quite a collection, so I chose rabbits and other farm animals for the nursery theme. If I could freehand whimsy rabbits I would have, but unfortunately freehand is not my medium, so I decided to use my tissue paper transfer method.


First I simply printed out my images on regular paper to see if I liked the layout.  My images came from two sources. The one on the left came from the Graphics Fairy, and the one on the right came from a seller on Etsy.


I did a test print on tissue paper, and then applied my image with matt Mod Podge. I finished it off lightly with AS Dark Wax to give it a cracked leather look.


Then I printed the actual images out on tissue paper, trimmed it to my liking, and applied it to the crib.


DONE! And oh so amazing!


Here are the textiles I chose to make my bumper and draperies with.


Finished! I made the crib skirt, bumper, draperies, and bedcrown draperies.


My crib is a drop side crib. These types of cribs have been recalled, however, DH secured it for me so it no longer can rise or fall.

See my pretty bumper? I will remove it once my baby is old enough to sleep in her crib.  It's there now mostly for aesthetics.


I will be featuring the bedcrown pictured above in another upcoming blog. Stay tuned.


The dresser is featured on a previous blog. I used the exact same AS products on crib that I used on the dresser.


That is Asia, my beloved puppy...


The end...

Halloween Pillows - D I Y bias tape and piping

My baby shower is coming up. It's going to be at my home and we thought it would be fun to have a Halloween theme. I went shopping for some inspiration the other day and saw the cutest decorative Halloween pillows, which would be awesome for the themes' decor. They were so expensive and for a seasonal item, just not worth the money. Nothing gives me more gratification artistically than to make my own stuff, and when I set out to make something, my first priority is to find as many materials as I can that are already on hand. I have loads of fabric, and hoped I would find something that would work for this project. Let me know what you think.

Halloween Pillows, DIY bias tape and piping, fleur4her, Palace in Wondeland


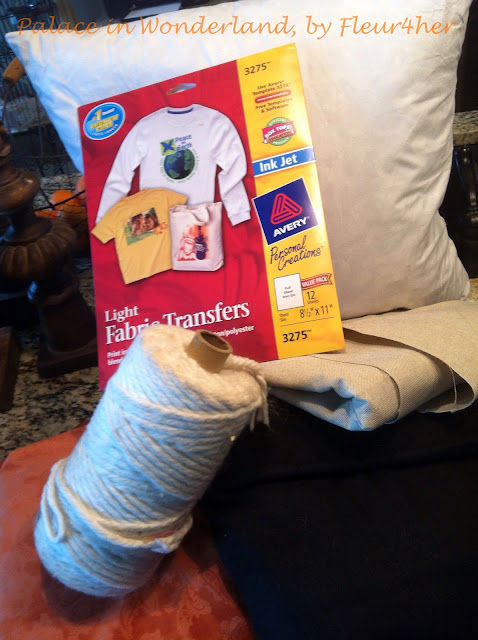
It took a while, but eventually I gathered all the materials.The only thing I didn't have was piping. I wanted something with a contrast, so I decided to make my own. This brief tutorial is for those who have never made their own piping.

Halloween Pillows, DIY bias tape and piping, fleur4her, Palace in Wondeland


What is bias? Bias tape is a narrow strip of fabric cut on a 45 degree angle. HUH? Here, maybe this will help http://en.wikipedia.org/wiki/Bias_tape. You can buy it at any fabric store, and when it is on sale, I suggest you picking some up from time to time, but if you don't have any, you can easily make your own.

How to make your own Bias Tape for piping, my way:

Materials

  • A rectangle of fabric
  • Fabric Chalk
  • Yard Stick or Ruler
  • Scissors
  • Cording


Step 1
Measure the length and width of your pillow. Mine were 20"x20". You will need enough piping to go around the entire pillow which would be approximately 80". Two pillows will need 160". Easy so far!

Step 2
Lay out your fabric. Begin by marking around the yard stick with the chalk at what appears to be a 45 degree angle. Do your best, but it doesn't have to be perfect. I drew a bunch of strips, and didn't bother to measure this because I did a lot and knew just by eyeballing it that it would be plenty, which it was.

Halloween Pillows, DIY bias tape and piping, fleur4her, Palace in Wondeland


I know what you are thinking...butterflies for Halloween pillows??? Just wait, you'll see.

Halloween Pillows, DIY bias tape and piping, fleur4her, Palace in Wondeland


Step 3
Cut them out. Then cut all of the edges to make sure they are squared off. Sew the edges together. Remember, Right Sides Together! You should now have a long strip of fabric.

Step 4
Measure out your cording. Since I know I need about 160", I gave myself an extra 20" incase of error, so I cut out 180".

Step 5
Attach your zipper foot to your machine. Take your bias tape and the cording, and simply wrap the cording with the bias tape. Sew very close to seal it in.

Halloween Pillows, DIY bias tape and piping, fleur4her, Palace in Wondeland

Halloween Pillows, DIY bias tape and piping, fleur4her, Palace in Wondeland


You are done! Now you have your own piping. Go ahead and attach to anything, whether it is a pillow or blanket. Whatever you like.

I would like to point out that the piping just looks black. It has little silver sparkles on it from the butterflies, but you can't see a single butterfly. Success!

Now onto my pillows. I decided to make pocket pillows this time since these are to be seasonal. I will make new covers for Christmas this year too (so long as my pregnancy goes well).

Halloween Pillows, DIY bias tape and piping, fleur4her, Palace in Wondeland

Halloween Pillows, DIY bias tape and piping, fleur4her, Palace in Wondeland


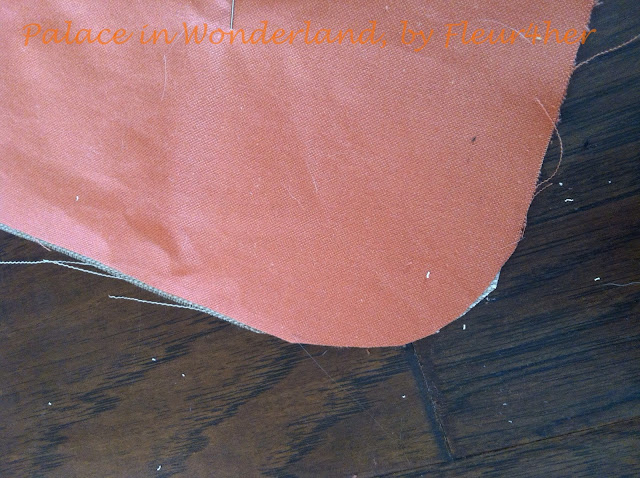
These are of the back, just FYI. Making a rounded corner instead of square is much easier for sewing on piping. I highly recommend this. Your finished product will still appear quite square.

Halloween Pillows, DIY bias tape and piping, fleur4her, Palace in Wondeland

Halloween Pillows, DIY bias tape and piping, fleur4her, Palace in Wondeland

Halloween Pillows, DIY bias tape and piping, fleur4her, Palace in Wondeland


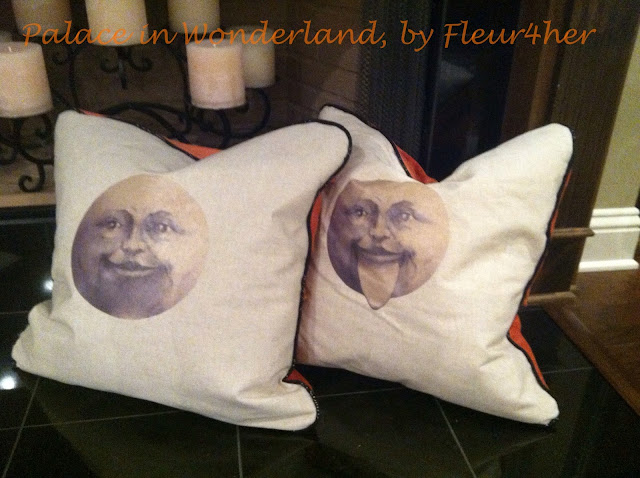
Peek-A-Boo!!!  I chose to do an iron on transfer method for these, as it will wash well in the long run. These lovely moon images came from Karen, my fairy godmother, at the Graphics Fairy. http://graphicsfairy.blogspot.com/search/label/Halloween%20Clip%20Art

Halloween Pillows, DIY bias tape and piping, fleur4her, Palace in Wondeland

Halloween Pillows, DIY bias tape and piping, fleur4her, Palace in Wondeland


Halloween Pillows, DIY bias tape and piping, fleur4her, Palace in Wondeland

I hope you like them. Stay tuned for more....

The little horse that will again

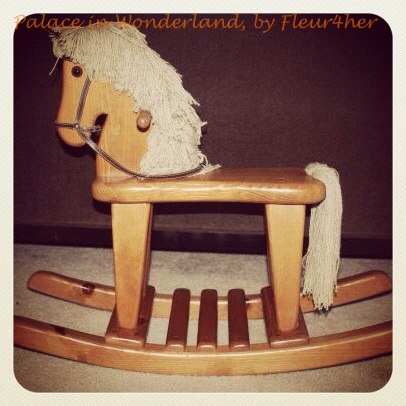
This was my little horse, when I was a baby. I remember rocking on him and loving it. I also remember that as I got a little bigger I would rock on him wildly!!! Such good times.

Vintage rocking horse, Annie Sloan Chalk Paint, dark wax, fleur4her, Palace in Wonderland


I hung onto my horse from my childhood for 30 years. When I moved, so did he. I didn't know what I wanted to do with him someday...all I knew was that he was NOT yard sale material! He moved from Ohio, to New Mexico, to Arizona, to California, and then finally to Louisiana. He spent his days and years in garages, dusty, on a shelf.

Vintage rocking horse, Annie Sloan Chalk Paint, dark wax, fleur4her, Palace in Wonderland
Here is my horse when he arrived at the salon...do you like his foils???

Anyhow, when I was working on my baby's dresser and crib, I said, why not refinish the horse with the exact same Annie Sloan paints and waxes? AS paints go a long way and I still had plenty for him. I love that paint so much because you can vary the colors to your own liking, and can either go light on the wax or heavy. I opted for heavy. I wanted the horse to still look loved and beat up a bit. Did I achieve my goal? You tell me.

Vintage rocking horse, Annie Sloan Chalk Paint, dark wax, fleur4her, Palace in Wonderland

Vintage rocking horse, Annie Sloan Chalk Paint, dark wax, fleur4her, Palace in Wonderland

Vintage rocking horse, Annie Sloan Chalk Paint, dark wax, fleur4her, Palace in Wonderland

Vintage rocking horse, Annie Sloan Chalk Paint, dark wax, fleur4her, Palace in Wonderland


Now he has a new life and will be loved all over again by our little girl. Can you see how happy he is too?

D I Y Mini Canvas Giclée

I spotted the cutest new product at Hobby Lobby. Framed white mini canvases! My store had three different frame styles, with each style having a few sizes to choose from. A great idea came to mind, and it turned out awesome! I just had to share.
DIY Mini Canvas Giclée, fleur4her, nursery, bunnies, Palace in Wonderland


I'm no Bob Ross (thinking of you mom ;) so I wasn't about to hand paint anything. Recently I had used some tissue paper on another project, which will be featured soon, so I thought I would give it a try on my mini canvases for the nursery.

I made up this DIY Mini Canvas Giclée. Maybe other people have done this too, but I truly just tried it on my own without any research. This is my method.

Materials


  • An image that you would like on your canvas
  • Mini framed white canvas from Hobby Lobby, or any canvas you would like
  • White tissue paper
  • One 8.5x11 piece of regular card stock
  • Painters tape
  • Scissors
  • Mod Podge, Flat
  • Paint brush
  • Annie Sloan dark wax (or any dark wax, or maybe even a dark glaze made from craft paint)


Method

Gather your image, whether digital or already printed out. I had a sheet of Easter images laying around in my old card making supplies. The bunnies were perfect for the baby.

DIY Mini Canvas Giclée, fleur4her, nursery, bunnies, Palace in Wonderland


Take your card stock and neatly wrap your tissue paper over it, with the dull side facing out. Fold, cut, and tape it to the back side of the card stock. What you should have is a piece of card stock that is nothing but dull tissue paper on one side, and trimmed tissue paper taped down on the back.

Place your card stock into your printer tray.

Print your image onto the tissue paper. You may need to do a test print on regular paper to see if your image will fit your mini canvas accordingly. Adjust the size as needed.

Remove the tissue paper from your printer and remove it from the card stock. Trim your image so that it will lay almost perfectly onto your canvas.

Remove mini canvas from frame.

VERY CAREFULLY lightly coat the back side of your image with Mod Podge. Try not to get it onto to your fingers. It may rip it! You don't need it perfectly covered, just a decent amount.

Apply your image to the canvas. There will be wrinkles, and that is good!!

DIY Mini Canvas Giclée, fleur4her, nursery, bunnies, Palace in Wonderland


VERY CAREFULLY continue to coat the entire front of your image which is now adhered to the front of the canvas. You want the Mod Podge on fairly thick, but not too thick that you can't see your image. Do this step quickly as you do not want the ink to get mixed into the Mod Podge, otherwise you will smear it around.

Allow to dry completely.

Dab a paper towel into your dark wax, and begin to coat your image. Wipe off wax.

Now your image should look antiqued.

Place canvas back into frame, and VOILA!

DIY Mini Canvas Giclée, fleur4her, nursery, bunnies, Palace in Wonderland

DIY Mini Canvas Giclée, fleur4her, nursery, bunnies, Palace in Wonderland

DIY Mini Canvas Giclée, fleur4her, nursery, bunnies, Palace in Wonderland


DIY Mini Canvas Giclée, fleur4her, nursery, bunnies, Palace in Wonderland


DIYMini Canvas Giclée!!!