So that was the dresser before. Like I said, it was bad. No wonder Annie just gave it to me, right? But what I loved about this dresser was that it wasn't your usual French Provincial redo. While I love that look, I get bored with it. This was something that someone truly made. It wasn't from a fancy furniture store. I could really see that someone made this for their home a long time ago. Oh and that cute little girl in the picture, that is my niece. She is my mini-me.
After some sanding with filter, I started to cover the dresser with primer. First I just used some spray paint primer because I didn't want to dirty my roller. Then it got three coats of Kilz primer. I filled all of the cracks with some painters caulk to make sure it was nicely closed off. Then I got to the repairs. The drawers needed new bottoms, and candle wax on the parts that slide because the dresser was made old school, and they were stuck. In the picture above, you can see a strap, that was for the leg that was bucking out. I took 3 weeks to gradually move that thing down and cinch it inward to straighten out the bad leg. It worked like a charm, but if you want instant gratification, in a case like that, you can forget it. You must be patient.
I repainted the inside of the drawers with an oops paint from Home Depot that was an ultra high gloss latex enamel. It took four coats because it was so glossy and I wanted a heavy candy like finish where I could see my reflection! BTW, see that rocking horse? ^^^^^ Check back for the DIY for that cutie!
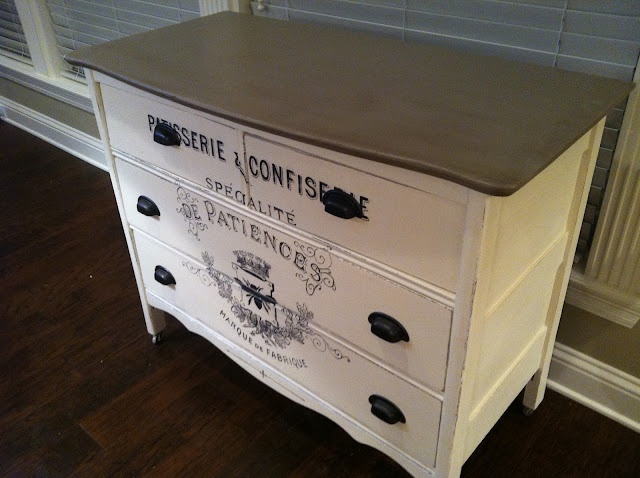
From there I got to painting. It is summer so I prefer to work indoors. I used Anne Sloan Chalk paint for the top and body of the dresser. Coco for the top and Old White for the sides. For the top, after three coats of paint, I sanded it by hand with a 1000 grit sand paper, because I wanted it super smooth. The dresser was so old it really needed it.
I then spray painted the original knobs with Rustoleum Oiled Bronze, five coats. They turned out awesome. Who needs to buy new when you can redo, right? For the graphic, I visited my fairy god mother at the Graphics Fairy, and found the perfect French label. I loved the bug on the jar, perfect for my baby! http://www.graphicsfairy-diy.com/2012/03/transfer-printable-french-patisserie.html
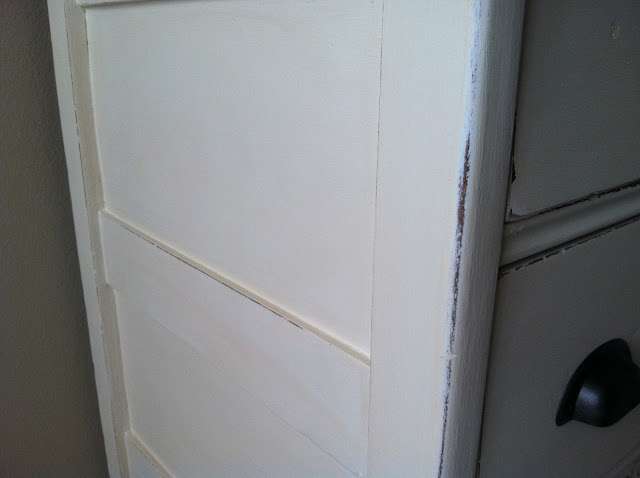
I did some light distressing on the sides and front...only where natural banging around would occur. After three coats of dark wax on the top and three clear on the sides, my baby's dresser was done! Hope you like it as much as we do.
Thanks!!!!


Gorgeous!!! I am SOOO glad that the dresser went to such a loving home! You had way more patience with that thing than I would have. Ha! The blog looks awesome, too! Can't wait to see upcoming posts!
ReplyDeleteThank you so much Annie. I love it so much and can't thank you enough.
DeleteUn maravilloso y espectacular cambio.
ReplyDeletefeliz semana......
Muchas gracias amiga :)
DeleteNice to see someone else that uses the inside of their house as a painting studio! You chest is absolutely gorgeous! Love it so much! Hopped over from Brag Monday and I'm happy to now be following you! Would love for you to stop by for a visit! Blessings ~ Judy @ www.vintagestreetdesigns.com
ReplyDeleteThank you so much for you kind comments Judy! Of course I am now following you too :) I do prefer to paint inside for so many reasons, one being dust control, two climate control, and three, bugzzzzz. Blek! I feel less rushed when inside. Someday I hope to have a studio!
DeleteGreat job.
ReplyDeleteThank you!
DeleteAmazing transformation! I love that you kept the original hardware, too!
ReplyDeleteHi thanks! Yes, I really wanted to keep the original hardware for two reasons. One, the style is actually very current so I got lucky there, and two, I always try to find ways to use what I have on hand first before financially investing more and more into projects. Doing so makes me feel more satisfied.
DeleteThis is gorgeous! Way to go mama! Congrats on baby and your blog! I just started one too! wherethegreengrassgrows.blog.com! You should come check it out.
ReplyDeleteThanks Cathlene. I appreciate your great feedback! I have several upcoming posts in the que so stay tuned. BTW I love your blog!
DeleteThe dresser came out AWESOME!!! I was wondering what the color name is of the paint on your walls in the background. I just love that mocha color! Keep the posts coming, I just love your style!!
ReplyDelete~Nicole
nicolka40@yahoo.com
Hi Nicole. Thanks fore the great feedback!!!! Sorry but I do not know the name of the paint, but I love it too!!! -Fleur
DeleteWow, this is gorgeous!!! You did an amazing job! Thanks so much for linking this up to Brag Monday. I'll be featuring your fabulous Dresser on my next Brag Monday post!
ReplyDeleteKaren, thank you so much! I am truly honored to be featured on the Graphics Fairy, and am looking forward to the upcoming Brag Monday. Yeah!!
DeleteComing over from Brag Monday. Congrats on a beautiful and very inspiring dresser and also on your new baby. I have to ask, was that one sheet of transfer paper or several all together? And how did you get it to print out exactly so each sheet lined up. Sorry, so many questions. I have almost the exact same dresser I would love to do this on. Thanks for sharing.
ReplyDeleteHi Barb. It was several 8.5x11 sheets of regular printer paper. I used an ink jet printer. To print exactly takes a lot of work and messing around with your individual printer options. It actually took a long time to get right because there was so much paper involved. Hope this helps you. -Fleur
DeleteWOW, what a glorious save. Welcome to the blog world. I look forward to your future posts. Congratulations on the new baby. Count me as a follower.
ReplyDeleteGreat, thanks so much Dawna!!!! I appreciate it. -Fleur
DeleteA friend recently gave me a perfectly good oak armoire and I would love to be able to give it this treatment.
ReplyDeleteWhat's the DIY for transferring the graphic to the furniture itself?
thanks!
There are several methods to choose from. I recommend trying a few different ones on some random pieces of wood to see what you are most comfortable with. I chose to use the burnish method for this piece. Hope this helps. Best of luck on your armoire! -Fleur
DeleteBeautiful! I really love the idea of Coco paint with several coats of dark wax on top! Congrats on the Brag Monday feature, and I am now following your blog! I love the Graphics Fairy and I painted my first transfer today! I don't have a blog (yet), but I am on Facebook at Essex Cottage if you have a chance to check me out!
ReplyDeleteDorene
Hi Dorene, thanks so much for following, and for your kind words. I find transferring fun and challenging. There are so many ways to do it...I feel like the possibilities are endless. I will look for you on Facebook. :) -Fleur
DeleteGreetings from France,
ReplyDeleteYour furniture is very successful !
Congratulation!
Cottage et Patine - France
Thank you so much! I am so glad that you like it. It is exciting to get a comment all the way from France. -Fleur
DeleteWhat a project, it came out beautiful! Gotta love the Graphic's Fairy!
ReplyDeleteThanks so much Barb!!!!
DeleteThe dresser came out amazingly beautiful. I attempted this same transfer on a chair recently. Can you "please" respond and explain how you were able to transfer the image onto the wood? What technique did you use? Others may know how, but this step is always missing from everyone's tutorial. I would love to know. Thanks, Christine in Los Angeles.
ReplyDeleteHi Christine. When it comes to transferring, there are always a few options on how to do it. A fail safe for me is the chalk transfer. I detailed it above on a separate post I recently wrote. I find it to be extremely accurate and works well on pretty much any type of paint. The reason why I didn't use it for the dresser was simply because of size. The image was so large that there would be no way I would not end up smearing too much of the chalk as I painted over it. That being said, I simply burnished the image onto the dresser...it is a less reliable method of transfer because a lot of it does not transfer over, and it does not work on every type of paint. This was chalk paint which is very absorbent so in this case it did work well enough. Almost all of the leaves in the image did not transfer at all so I had to rely on my image and my own free hand to paint them....which was tough. I hope this helps you out. Take care -Fleur
DeleteHi Fleur. Thanks so much for your quick response. I'll look for your post on chalk transfer and see how it all works. I appreciate your help because the chair I did was canvas, but I had also painted the chair previous to attempting the image transfer. Since I only know to use "heat"...let's say there was a little melting involved, but not so much I wasn't able to glue the mistakes so that you can't notice. The transfer came out light as well, and I ended up using a black sharpee to give the image depth. I like it, and am going to add some crystal embellishments to disguise any other flaws. :0) Thank again, and I love your work! Christine
DeleteThis is a fabulous makeover! You used one of my new favorite graphics from The Graphics Fairy, too. It looks great on the front of this dresser. I just used it on a table makeover myself.
ReplyDeleteJust saw this on brag Monday, again! Love love love love love love love it! Inspiring! BTW did the baby love it too? :) Congratulations
ReplyDeleteYes! I had my baby and have been enjoying my babymoon ;)
DeleteI plan to post another blog by this coming Monday, and since you like the dresser so much, I know you will like this one coming up. Let me know what you think!!!! -Fleur
You did a wonderful job on it - it looks absolutely stunning & is beautifully finished!
ReplyDelete